CMD can display and print pictures of families or individuals in your data file. Pictures are printed on various forms that CMD generates including the Child Registry page, Offices Rap Sheet, Individual and Family Profiles, and any of several Church Directory output forms.
CMD Picture Format and Dimensions
This is very important! All of CMD’s pictures should use the same proportion, dimensions, and resolution. When you import a picture into the CMD file for a person or a family, always use the recommended dimensions, format, and resolution. If you ignore them, you may well overrun CMD’s internal buffers and create errors when the pictures are printed or displayed. Further, the pictures will not be displayed in correct proportion.
See Picture Specifications for specifics.
Note that it will be very helpful in linking pictures to families if you will also name them during your editing process in such a way that it will be easy to recognize which family the picture goes with.
First Steps for Using Pictures
Before you can link a picture to a family or individual, you will need to first know where to store your pictures once they have been edited for CMD's picture specifications, and then how to bring the picture into your CMD data file.
•If you are self-hosting CMD either on a stand-alone computer or as a computer on a local network, you will store your pictures here:
C:\CMD-SFM\WebApps\Pictures
•If you are using the fully hosted option for CMD, you will store your pictures here:
S:\CMD-SFM\Pictures (the S: drive is the drive for your remote host's implementation of CMD)
Either way, you will need to go to the Configuration | Configuration Update item on the File Menu to tell your CMD where to find the pictures.
After you have placed your pictures in the appropriate folder, you will then need to link them to families or individuals. In a sense, you will have two copies of the pictures on your drive. The first copy is in the above mentioned folder, and once you link a picture with a family or individual, that picture also becomes a part of the actual data stored in CMD's data tables. This redundancy is intentional in case there's any file corruption that creeps in later on because of a hard disk defect, etc. Having the original pictures in one place allows CMD to re-import the pictures with a single command later on.
How to Link Pictures to Families
Assuming you have placed your pictures in the correct folder as outlined above, you have two ways you can link a picture to a family:
Using Enter/Modify/Delete Names' picture tools
When you are on the Enter/Modify/Delete Names dialog, you can use the drop-down box located just under where the picture is located.
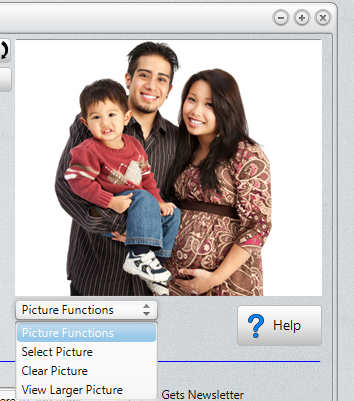
Here are your options:
•Select Picture. Clicking this option brings up the Load Pictures dialog. Once there, click Find Picture to see a standard Windows Open dialog where you browse for the folder where the pictures are. Once there, you will see either the names of the pictures or the pictures themselves (depending on how you set the dialog's View Properties). Click on the picture/name you want to link with the family currently on the Enter/Modify/Delete Names dialog, and then click Open. That will bring the picture back to the Load Pictures dialog. Click Save Picture if it's the one you want. You can also use this dialog to Clear the picture as well.
•Clear Picture. If you select this option, the picture currently associated with the family displayed on the Enter/Modify/Delete Names dialog will be immediately cleared.
•View Larger Picture. This option displays the picture in a larger dialog.
Using the Pictorial Directory Definition Utility
The Pictorial Directory Definition dialog also allows you to define a picture for a family.
How to Link Pictures to an Individual
You link pictures to individuals by using the Show Individual Picture dialog, which can be reached in two ways. Once there, the process for the selecting of pictures is the same.
1.The first way is to click the Utilities drop-down box on Enter/Modify/Delete Names located in the lower left corner of the dialog. One of the items is Individual Picture.
2.The other way is to click the Show Individual Picture button on any Find Person dialog in CMD.
Once you arrive at the Show Individual Picture dialog by either of the above two methods, you will see that there are buttons along the bottom of the dialog that allow you to Select or Clear the picture.
Backup and Restore for Pictures
The process of backing up and restoring pictures is done whenever you backup your CMD data. Since pictures are now a part of CMD's actual database files, your backups will be quite a bit larger than you are used to in past CMD versions because the pictures are a part of it now.
This means that you will need to resort to something like DropBox if you pass CMD data between stand-alone computers using CMD if you have a number of pictures in your file.
Since the pictures are a part of the actual data file starting in 2019, any data restored onto another computer using CMD will also have the pictures included in the restore.