The Mark Attendance dialog, available when you select the Mark Attendance option on the Attendance Menu, is used to mark the attendance for small or large groups of people, or even your whole congregation! In addition, you can optionally print name tags for names as you mark them for attendance all in one operation.
The Mark Attendance dialog allows you to view a number of different sub-groups based on some of the fields provided in Enter/Modify/Delete Names.While the process of actually marking the names for attendance is very easy, you should make sure that you fully understand the use of each control on this dialog before you proceed.
Additionally, there are two special functions available for marking attendance:
•You may use a handheld scanner to enter attendance. See Using a Scanner to Mark Attendance for more information
•You may use either CMD's internal record number to scan, or you can optionally define a list of external bar code numbers for use with third-party bar codes
Here's a screen grab of the Mark Attendance dialog:
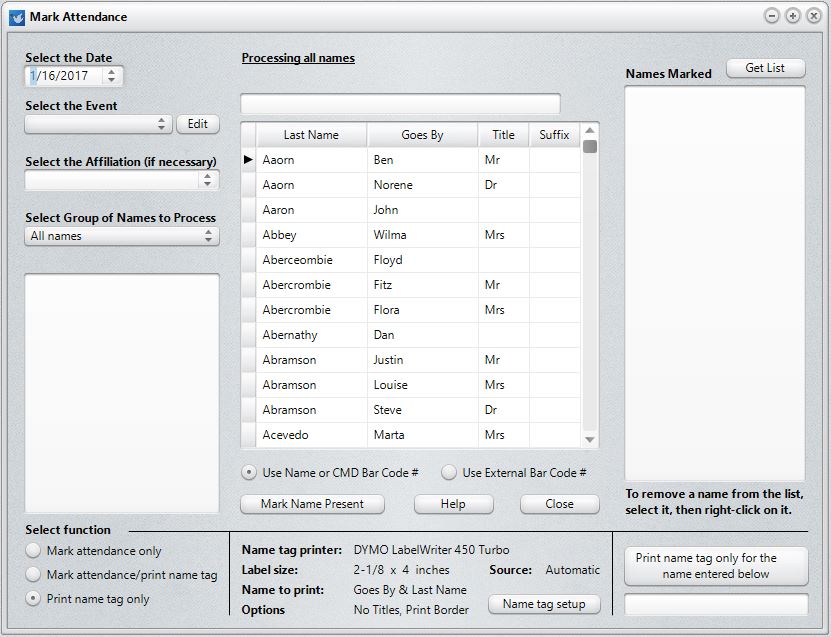
Following is an explanation of the controls used in the process of marking attendance and for printing the optional name tags:
•Date. You must select a date for which to mark attendance. While you may enter the date in manually, we recommend that you click the icon on the right edge of the Date edit box to select the date from a pop-up calendar.
•Event. You must also select an Attendance Event. If the event you wish to mark is not on your attendance event's list, click the Edit events list button just to the right of the Event selection combo box.
Note that you can define any number or type of attendance events. CMD contains a number of default events to give you some ideas on how best to take advantage of attendance. However, you are free to add or remove events as appropriate for your setting.
•Affiliation. If you use the Affiliation field, you may limit the names that you see in the list from which you mark attendance to the names with the Affiliation choice that you select here. If you do not need to use Affiliation as a criteria, leave it blank or enter No Selection.
•Group of Names to Process. This combo box, which displays All Names by default, allows you to select any of a number of CMD’s data fields to use as a filter for the list of names that you work from while you are marking attendance.
For example, you may wish to enter attendance for the members of your Youth-aged SS department. To limit the names that appear on the pick list so that you will only see names in your Youth department, open the Group of Names to Process combo and select SS Class/Division Names from the drop-down list. This causes the list of all your SS Classes/Divisions to be listed right below the Group of Names to Process combo. Click on the item in the list box that represents your Youth department. Once your selection is made, only the names in that class or division will be visible in the names list.
If you wish to enter attendance for another SS Class or Division, you may click directly on it in the list at any time and immediately the list of names will change to reflect your new choice. Or, if you wish to mark attendance for a list of names based on another field, open the Group of Names to Process combo again and select another field from the list, and select the appropriate item listed below the combo box. Note that you can also select any Quick List category for marking attendance as well.
Click this link for instructions on selecting a user date as the criteria for the group of names to process.
•Get List. The Get List, located atop the Names Marked list, allows you to recall the names who have been marked for attendance for the date and event you have selected. This gives you the option of leaving an attendance marking session and then returning later and picking up where you left off. Set each of the options above to the settings needed, then click Get List if you wish to finish marking a list you have not finished with. The list of names, in the same order they were entered, will appear in the Names Marked box. Note that any changes in the settings of the above parameters will cause the list to be erased, so make each of the selections appropriate to the list of names for which you wish to mark attendance first, then click Get List.
Selecting the Names to Mark as Present
Once you've specified the date, the event, and the group of names from which you'll mark people present, you will work with the center column in the dialog. At the top you'll be reminded which group of names you are processing.
Click in the edit box at the top of the list of names to start typing in the first few letters of the last name of the first person you wish to mark present. Once you've found the person you wish to mark present, you may simply press Enter to mark them present, double-click on their name, or click the Mark Name Present button in the bottom of the column.
As you mark names, they will be listed in the third column.
When typing in a name, it will not always be quickest to type out the whole name. You can often save some time by using the mouse or even the cursor keys to navigate to the exact name you want to mark present once you get close to the name.
The grid displaying the list of names many be resized to look best on your screen. Move your house pointer to the vertical line separating the Last Name and Goes By field and drag as needed. Any changes to the column sizing will be remembered the next time you enter here. If the Suffix field is not visible, you should resize to allow it to be seen.
Deleting Names from an Attendance List
Once you have marked a name as present for a given date or event, you can delete the name from the list by following these steps:
1.Click on the name to be deleted in the Names Marked list to highlight it
2.Right click with your mouse point directly on the highlighted name and answer the prompt. If your answer is yes, the name will be removed from the attendance date and event.
Printing Name Tags
The area near the bottom of the Mark Attendance dialog allows you to control the printing of name tags. The name tags must be printed with one of Dymo's LabelWriter™ printers on one of several forms that we have selected. Click here for Name Tag Printer & Form Information.
For controlling the printing of name tags, you have three basic options:
•Mark Attendance Only. Selecting this option means that when you mark names present, no name tags will be printed.
•Mark Attendance & Print Name Tag. Selecting this option means that CMD will generate a name tag for each name that you mark present.
•Print Name Tag Only. This prints a name tag but does not mark the name present. Note that when you select this option, you will still need to select an Event Date and an Event even though no attendance will be marked.
There is actually a fourth option for printing a name tag. If you need to print a name tag for a person who is not in your CMD file, click in the small edit box in the lower right corner of the dialog and type in up to two lines for the name to be printed, then click the button labeled Print Name Tag Only for Name Below.
To the right of the three selections noted above, there is a list of parameters used when printing name tags. If the parameters need to be changed, click the Name Tag Setup button to get to the Name Tag Setup dialog where the parameters may be modified.
Print Bar Code
If you need to quickly print a single or a few bar codes for names in your file, first highlight the name on the Names List, then click the button just to the right of the dialog's Close button with the bar code icon on it for the Print Bar Code dialog. If you need to print bar codes for a long list of names or names based on some specific selection criteria, use the Bar Codes for Attendance Output Form on the Print Control page of Print Names.