Use the Create New Remote/Network CMD File dialog If you wish to create a new CMD file that will be used on a network or remotely and the remote database server software has already been setup and configured.
You can arrive at this dialog either because you are creating that first CMD file, or because you have selected the Create New Remote/Network CMD File on CMD's File | Create New CMD File menu item.
Here's the dialog:
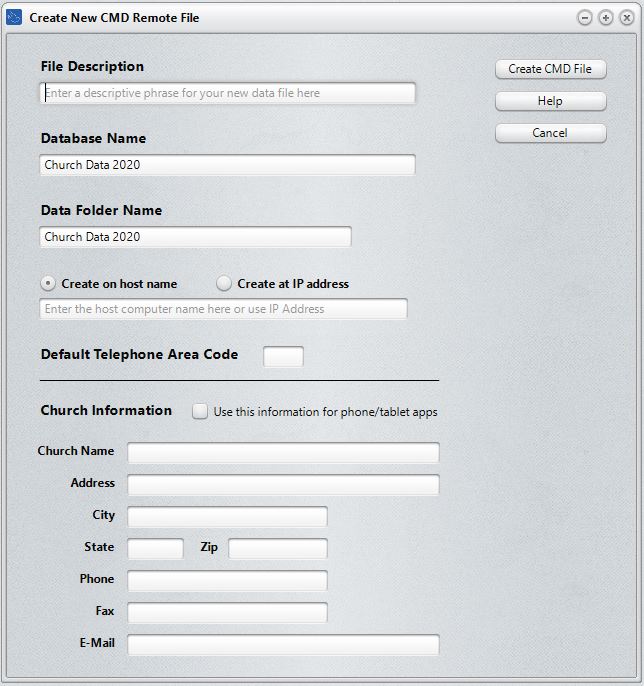
Available fields:
•CMD File Description. The File Description field is used to tell you at a glance about the information that will be stored in this CMD File. A good way to use this field is just to enter your church’s name. Here are a few examples:
First Community Church Data
Freemont Bible Church Parish Information
Our Church Data File
You may enter up to 40 characters for the File Description. Since you may end up creating additional data files in the future, entering a descriptive phrase here will enable you to easily distinguish between them. When you are finished entering the File Description, press TAB to move to the Database Name field.
•Database Name. This is actual name of the CMD database that will be created. This name must be unique for each CMD data file you create since CMD will use it internally to differentiate between any CMD data files that you create. The suggested default is Church Data 2020.
•Create on host name. Select this option if you are creating this new file while at the host computer or hardware server. If you do not know the computer's name, click Start, then right-click Computer (or My Computer) and select Properties. Different versions of Windows present this differently, but somewhere on the Properties dialog you'll find the computer name. That's what you should enter here.
Note that you can also enter a domain name if that domain name points to the host computer. However, we prefer that you use the actual Computer Name of the host computer when create a CMD data file while running CMD on the host computer.
•Create at IP Address. Select this option if you are creating this CMD file on a computer whose IP address is known. Generally, this will be used when creating a CMD file remotely or from a client computer in a network. This address must be a static IP address.
•Data Folder Name. All data folders for CMD files created on this host computer or hardware server will be placed under the configuration folder that was defined when the remote database server software's configuration was set up. That means all you need here is a unique folder name to hold the data. Since you can create additional CMD files if you wish, you will need to make sure that each data folder is uniquely named. If you wish, you can name it the same as the Database Name field above.
•Default Telephone Area Code. Enter your local area code here.
Once all of these fields have been entered, click the OK button and CMD will begin to create your new CMD file. Because CMD creates the actual data files from within the program's code itself, it will take about 30 seconds for CMD to complete this task. When it is finish, you'll be taken to CMD's main dialog where you can begin entering information or import data from CMD 2012-2019.
Note that by default you do not need to log in. There are no default user names or passwords. If you wish to create them, you'll need to go to Preferences | User Administration and define them there.
Church Information
Space is provided to enter the contact information for your church. This information is used in several places within CMD. While you can also add or update this information by using the Church Information item on the Preferences Menu. it will be simpler to enter it here while you are creating your CMD 2020 data file.
There is a check box at the top of the church information that says:
Use This Information for Phone/Tablet Apps
Check that box if you wish for the address information you are entering now to appear when the phone/tablet apps are accessed. The church address that is displayed when these apps are run may also be entered or updated later by using the Web Server Setup dialog on the Utilities Menu.