The Backup Data dialog provides the means to initiate a backup of your data at any time. This integral backup and restore service in CMD provides for the greatest data security. Making frequent backups is one of the most important habits you can develop! We can help you solve most any problem with your CMD setup if you have good backups of your data.
We highly recommend that you make use of CMD's backup functions rather than rely on an external computer backup system you may have in place. If you have a computer disaster, it will be much easier to restore your CMD quickly if you have separate backups of your CMD data on separate media.
CMD actually has two backup systems built-in, one that you initiate either by your own volition or by reminders based on several criteria that you can set, as well as one that is completely automatic that takes place every two weeks without your initiation. Use the Backup Information dialog to set reminders to make sue that you are backing up your valuable data on a regular basis. Here's what the Backup Data dialog looks like:
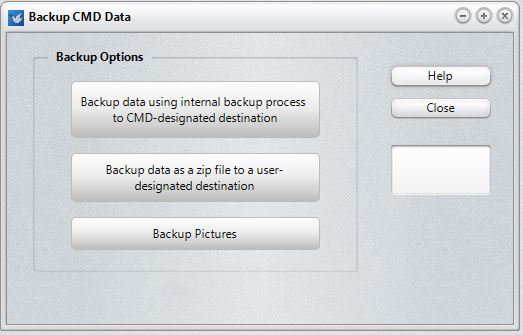
There are three different options for backing up:
•CMD-Designated Destination. This option creates a backup of your data using the built-in backup mechanism provided with CMD's data engine. Its use requires that you dedicate a permanent, specific folder location to receive these backup files. They are in a proprietary zip format customized specifically for the data engine. This is the backup format and destination used for CMD's auto-backup function that takes place every two weeks.
While the default destination for these backups is the C:\CMD 2020 Backups folder on your host computer, we highly recommend that you procure an external hard drive and that the CMD-designated destination is set for a folder on this external drive. The automatic backups that CMD produces will do you no good if they are going only to your C: drive and that's the drive that you lose! Having the backups go to an external hard drive will protect you from a C: drive failure!
To change the location of this backup destination, see the Configuration Update dialog.
Special Note: If you are using CMD with the remote database server software, all drives and folders refer to drives and folders connected to the actual host computer. These backups cannot be made to a client computer, only to drives/folders on the host computer.
•User-Designated Destination. This option allows you to send the backup to the destination of your choice. While the set of files backed up is identical to the ones backed up in the CMD-Designated Destination above, this option uses standard ZIP file format instead of the proprietary one used with the CMD-Designated option. Use this option if you wish to send your backup to a flash drive, a CD-RW, or a location on your network.
Special Note: You can only use this backup function if you use CMD on a stand-alone computer where the data resides on the computer you are using, or if you are at the host computer when CMD is set up using the remote database server software. It cannot be used from a client computer - only the host. An error message will result if you try to proceed otherwise.
Note that if you are saving to a flash drive, it is very important to use the Windows "Safely Remove Hardware" option on your computer's System Tray (that's the area in the lower right corner of your screen. One of them will be for removing hardware). Do not remove the flash drive until after you have used this function otherwise Windows may not have emptied its buffers and you may end up with only a partial backup, which is totally useless. Always use the Remove Hardware function, and do not remove your flash drive until Windows tells you it's safe to do so.
•Backup Pictures. This option uses a standard ZIP file format to create a single-file backup of your pictures. Depending on the number and size of your pictures, this may result in a very large file!
Backup Files Location
For the CMD-Designated backups, CMD backs up its files exclusively to a single location. By default, that location is a folder named C:\CMD 2020 Backups. Note that it is created right off the root of your C: drive so that you can get to it easily. You can change the location where these backups are sent on the Configuration Update dialog.
Special note: if you wish to change the location where the backup files are placed and you are using CMD 2020 with the remote database server software, then you should make any changes to the backups destination folder on the actual computer that is hosting CMD's data. The location of the backup files is always relative to the host computer. When backing up using the CMD-Designated backup location, even when a backup is initiated on a client computer, the actual backup is sent to the folder designated in the configuration relative to the host server (and not the client). That means that you cannot create a backup file on a client that ends up residing on the client computer. It will always go to the designated folder in the CMD Configuration relative to the host computer. If you are using the User-Designated backup option, the data will be saved onto the location designated on the computer making the backup, including clients. Note that backups made over the internet onto a client computer will be very slow because of the large amounts of data moving across the internet.
Best Practices for Backups
While we create the C:\CMD 2020 Backups folder by default, our best suggestion is that you do not leave this as your regular backups location. We highly recommend that you have an external hard drive directly connected to the host computer, and that you create a backups location on this external hard drive.
If you cannot obtain an external drive, then the next best suggestion is to copy the backup files from the C:\CMD 2020 Backups folder to a flash drive or CD-RW at least every two weeks when the auto backup is done. If you do not have backups on different media than your hard drive, if you have a crash, you will not have any data to restore! Make sure you offload the backups occasionally if you do not have an external hard drive onto which CMD can place its backups.
The Backup Process
The process for manual data backup is easy and brief. Click File | Backup Data. When the Backup Data dialog appears, you'll notice the Backup Options group box with 3 large buttons displayed.
•If you click the first button, to use the CMD-Designated destination, the backup process will begin immediately.
•If you select the User-Designated or Backup Pictures option, then you will first need to select a location for the backup to be built and placed. By default, the Save dialog appears with the backup destination defined on the Backup Information dialog.
Note that you cannot selectively backup individual data table files within a CMD data base. Because of the password and user security features, all data files are electronically linked together. The data in the files will not be accessible if the files are restored separately from the rest of the data files in a CMD data file set.
The Backup Data dialog's progress bars will keep you informed of the progress when backing up either the User-Designation option or Pictures.
Data Backup Frequency
We recommend that you backup your data frequently when you are entering or updating large amounts of data. Do at least one additional backup at the end of each week.
For added safety, make a third backup weekly and keep it off site in a different place from the other backups.
Also, make sure you keep the date in the backup file name. This forces the program to create a new backup file each time you make a backup. This may be useful if we need to debug your data later on.
See also: Backup Information