Use Restore Data when your data files become damaged or corrupted or when you need to bring data from another computer to yours. To restore data, click File, then select Restore Data.
Important!
If you have installed more than one data file set in CMD for Windows, before you restore any data you should first make sure that you have the correct data file opened because the restore process will restore the data into the file you currently have open. Check the file's description in the lower left portion of the screen in the status bar. If you do not have the correct file set opened, you'll restore data over the incorrect data file set! There is no undo for this mistake other than restoring from another backup for the file you've incorrectly overwritten.
CMD gives you two source options for restoring data:
•Restore from the CMD-Designated backup destination. CMD maintains a specific location for CMD-designated backups, which must also be used when restoring. You can change this location on the Configuration Update dialog. This backup is a proprietary zip file format that is native to the data engine used in CMD. All backups and restores go into/from this same location. See Backup Data for more information.
•Restore from a Zip file at a user-designated location. CMD also allows you to create a backup using standard Zip file format, which can be placed in any location you wish. Likewise you can restore from a zip file backup from any location.
Here's what the Restore Data dialog looks like:
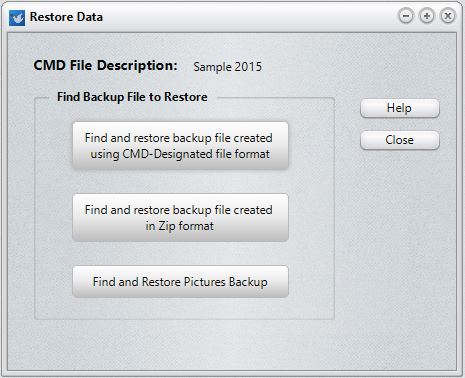
Once you are sure the file that is currently open in CMD is the one to which you wish to restore, you can click either of the first two options as shown above.
For CMD Data Files
•Click the Find/Restore button for CMD-Designated backups and a small dialog will appear giving you the list of available backup files. Click on the one you wish to restore, then click the OK button. This will bring you back to the Restore dialog where the restore process begins automatically. Click Close when you are finished, or restore pictures if desired as well.
•Click the Find/Restore button for Zip format backup files and a standard Windows Open dialog appears. Use the dialog's tools to navigate to where the zip file is located, click on it, then click Open. This will bring you back to the Restore dialog where the restore process begins automatically. Close Close when you are finished, or restore pictures if desired as well.
Special Note: You can only use the Zip format restore function if you are using the host computer where CMD is set up using the remote database server, or if you are using CMD on a stand-alone computer where CMD's data is on that computer. Do not try to restore from a client computer! It won't work.
For CMD Pictures
•Click the Find and Restore Pictures Backup button to bring up a standard Windows File Open dialog. Use the Windows Open dialog's tools to navigate to where the pictures backup zip file is located, then either double-click on it or click on it and then click OK. This will open the backup file and return you to the Restore Data dialog where the restore process begins immediately.
NOTE: Make sure you understand that you cannot make changes or additions to your data file on several different computers and then "merge" them together somehow. Make changes on one machine, and then do a backup that can be taken to all other computers in your church and restored.
However, if you need to frequently move data around like this, you will be better served purchasing the remote database software server from us and then tie all the computers that use CMD into one data file. This eliminates many problems!