The CMD e-mail client is a built-in dialog you can use to send e-mails right from within CMD. Though it's a very basic e-mail system, it may well be sufficient for many uses.
The CMD e-mail client appears when you have checked the Address E-Mail if Available check box on some of CMD's print control dialogs, or when you use the Send E-Mail from Here option on a Name Search dialog.
Please note that you must define the Outgoing Mail Server name for your e-mail service, a sender's name, a valid e-mail address for the sender.
Whether you get here via the Name Search dialog or a Print Control dialog, when the CMD e-mail client dialog appears, the address or addresses you've selected will appear in the "To" field in the Recipient Information box. Following the screen capture is an explanation of each field on the CMD e-mail client:
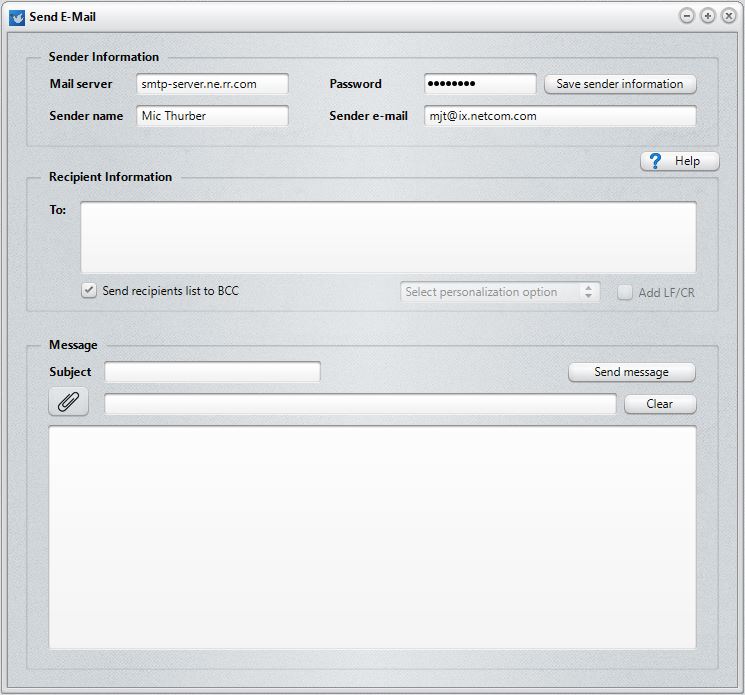
Sender Information
There are three fields in the sender information box, and you must have these fields populated by valid information or the e-mail client cannot deliver your e-mail:
•Mail Server. This field holds the outgoing mail server information that is used when you set up your e-mail service in Outlook or another e-mail program. If you do not know the outgoing mail server's name for your internet provider, you will need to contact them and ask for the correct server name. It should look something like this: smtp.mymailserver.net.
•Password. While the password you enter here will be saved to the Sender Information file if you enter a password and then click the Save Sender Information button, we suggest that you do not save your password if other people use this computer and have access to CMD. If the password must be entered before sending any e-mail, this prevents unauthorized users from sending out e-mails under your name. So use your best judgment here. If you are sure you are the only one who will use CMD on this computer, you can safely put your password in and save it with the other information.
•Sender Name. This field determines how your name will show up in any messages received. While actually not required, it might help prevent some recipients from simply deleting your message because they will not know who sent it.
•Sender E-Mail. This field is required, and if it is not a valid address, your mail server most likely will reject the message and prevent it from being sent.
•Save Sender Information. Once you have entered the mailer server, sender, and sender e-mail information, click this button to have CMD remember it and bring it up the next time you need to send an e-mail.
Recipient Information
There are two fields in this box:
•To. This is the area where the e-mail addresses for those who are to receive the e-mail are entered. You are free to type in an e-mail address if you wish, but most times an address or addresses will already be placed there for you. If you elected to send an e-mail to a list of people from Print Names or one of CMD's other print dialogs, the e-mails for the list of names you selected will appear here automatically. If you selected the Send E-Mail From Here option on a Name Search dialog, that one name's e-mail will appear here.
•Send Recipients List to BCC. If you wish to protect the e-mail address list from being sent to each recipient, check this box. This means that each e-mail recipient will be address as a blind carbon copy address, and only their own address will be visible when it's received.
Personalization
If you wish to personalize your e-mail using either the Goes By or Title/Last Name fields, open the drop-down box that says Selection personalization option located just under the Recipient list area. The options are:
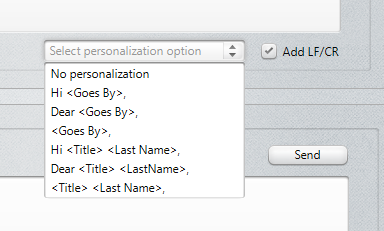
You can select from a number of options to personalize your e-mail letters. For example, if you select Dear <Goes By>, then your e-mail will start out as "Dear John, ". If you wish to add a LF/CR (line feed/carriage return) after the greeting, check the Add LF/CR check box.
It takes a bit longer to send e-mails this way (though it's only seconds...). That's because CMD has to build a new e-mail for each person in order to personalize it. When personalization is not used, then the list of address and the e-mail message is sent all at the same time, resulting in a faster process. When you send with personalization, there is a counter that will appear next to the Send button that will show you the progress.
Note that the personalization options are grayed out when you are sending an e-mail from within Enter/Modify/Delete Names or from the Find a Person dialog. That's because you are only sending one message to one person from those places, so you can easily personalize it however you want as you are creating the e-mail.
Message
•Subject. Enter a title or subject header to identify what the message is about.
•Message Body. The large box area is where you can enter the body of the message. There are no special character or formatting options at this point, so it will just be simple text. However, you are free to type in a message of up to 64,000 characters if you wish.
Attachments
You can attach files to your e-mail by clicking the paper clip icon just below the Subject line. You can add more than one, but you can only add one per click. If you wish to clear out all the attachments, click the Clear button to the far right edge of the attachments line. Note that you cannot manually insert a file name to be attached because when the standard Open dialog is used, the full path the file is used so that the e-mail client can find the actual file.
Also note that what is saved in the Sent E-Mails file is only the file name and not the actual file. If you need to preserve the actual file, you will need to do that separately.
Sending the E-Mail
Sending is as simple as clicking on the Send E-Mail button. If the message was successfully send, you will be informed via a small dialog. If it fails, you will be informed as well. If it fails, it's almost always because of inaccurate information in either the Mail Server or Sender E-Mail fields. If you get a failure message, correct the error and then resend.
Once an e-mail has been successfully sent, it will be recorded in the Sent E-Mails file. To view past e-mails, click Tools | E-Mail | View Sent E-Mails.